
Vehicle headlight restoration tutorial
, by Ivo Reins, 4 min reading time
, by Ivo Reins, 4 min reading time
Restore car headlights at home. Polishing, headlight clear coat renewal, and polymerization methods compared with costs, durability, and tips.
Modern headlight lenses are typically made from polycarbonate plastic, which is covered at the factory with a UV-resistant clear coat. Over time, environmental factors (sunlight/UV, road debris, chemicals) degrade this protective layer, causing oxidation, yellowing, micro-scratches, and a hazy surface. Cloudy headlights are a safety risk, as hazed areas reduce headlight brightness and sharpness, decreasing visibility, and they also make the vehicle look visually neglected.
There are several ways to restore headlight clarity:
Headlight polishing – restores clarity mechanically by sanding and polishing
Headlight clear coat renewal – sanding and applying a new protective clear coat
Headlight polymerization – vapor-based surface restoration using a special tool
This guide focuses mainly on manual headlight polishing, with additional methods explained later.
Improved visibility and increased safety
Better visual appearance
The process must be repeated once per year to maintain perfect results, as the original UV-protective layer has already been removed
If the damage is deep or originates from inside the headlight, it cannot be repaired using this method
Degreaser
Degreasing wipes
Waterproof sandpaper
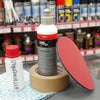
Polishing compound, 50–100 g
Several polishing cloths
Microfiber towel
Total cost at an automotive paint store (Vienības gatve 29a, Riga): Starting from 12 euro, depending on state of headlights thus necessary materials.
Mask off the area around the headlights to protect surrounding paintwork during sanding. Clean and degrease the headlight surface.
Use starting from P400 (severely damaged), P800(significantly foggy) or P1000 waterproof (slightly foggy) sandpaper, depending on the condition of the headlight. Wet the sandpaper and the surface with water.
Avoid sanding in only one direction. The most effective method is cross-hatching: 2 strokes up and down, 2 strokes left and right. Repeat this pattern to avoid deep sanding lines in a single direction. Continue until the surface is evenly sanded.
Use P1500 sandpaper and repeat Step 2.
Use P2000 sandpaper and repeat again.
Use P3000 sandpaper on a soft backing pad and repeat once more.
Thoroughly clean and degrease the surface. Apply a small amount of rough / headlight polishing compound to a polishing cloth and work it into the surface using firm, moderate pressure. Polishing by hand will take some time, starting from 30min per headlight, depending on skill.
The goal is to polish out imperfections, not to fill them with compound.
Remove polishing residue using a microfiber towel, clean with degreaser, inspect the result, and if everything seems good, if surface not clear, repeat step 6. apply headlight protection coating.
Remove oxidation and yellowing by sanding:
Start from P240 for very badly damaged headlights
Start from P400 for noticeable yellowing
Start from P600 for light fogging only (Don’t sand any finer, because the clear coat needs to physically bond with the grooves on the headlight surface.)
Apply headlight clear coat evenly
After fully drying (read on specific package), apply a headlight coating, UV protection layer
Requires a special polymerization tool
WEAR PPE (gloves, mask, eye protection)
Slowly and steadily move the tool across the headlight surface to restore headlight clarity